환경 및 배경
- Windows 10 CMD
- Terraform
- AWS
- WEB, WAS, DB로 이루어진 3 tier Architecture 구성
- 네이밍룰: terra-리소스-영역-az ex) terra-subnet-pub-a
Terraform 다운로드
https://www.terraform.io/downloads.html
Download Terraform - Terraform by HashiCorpDownload Terraformwww.terraform.io
- 알맞는 Windows 파일 다운로드
- zip 파일 풀기 > terraform.exe 파일 위치를 환경변수 등록

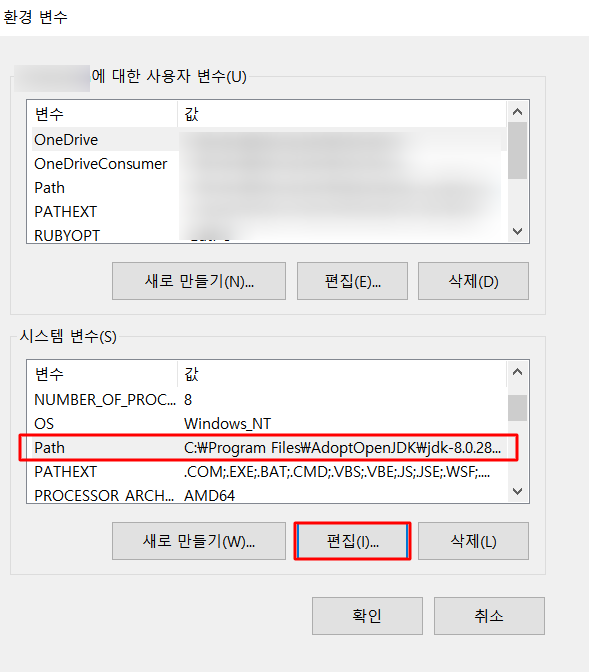
 terraform.exe가 존재하는 위치에 환경 변수 등록
Terraform 확인 및 init
이후 명령어는 모두 CMD 창에서 진행
- Terraform 설치 확인
terraform

- terraform init
해당 명령어를 실행하기 전, 먼저 AWS 계정과 연결해야 한다.
AWS Console에서 [계정이름] -> [내 보안 자격 증명] -> [액세스 키] -> [새 엑세스 키 만들기]
 해당 액세스 키는 유출되지 않도록 조심
이 액세스 키를 만든 다음 받은 ID와 PW로 provider.tf 파일을 테라폼 코드를 저장할 폴더 위치에 생성한다. 테라폼은 기본적으로 폴더 단위로 명령어를 인식하기 때문에, 폴더를 나누는 것이 중요하다.
provider "aws" {
    access_key = "액세스키"
    secret_key = "액세스키 비밀번호"
    region = "ap-northeast-2"	# 지역을 서울로 선택
}
이후 cmd 창에서 해당 폴더 위치에 terraform init 명령어를 주면
terraform init

테라폼을 실행할 준비가 완료되었다.
AWS 3 tier Architecture

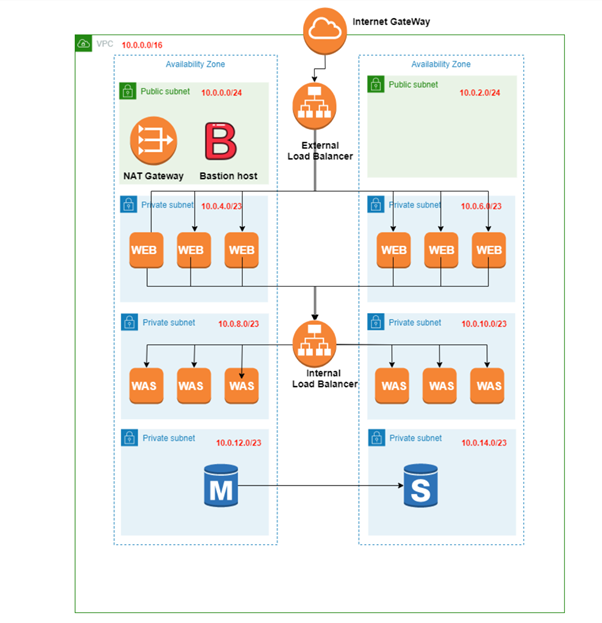
출처 medium.com/the-andela-way/designing-a-three-tier-architecture-in-aws-e5c24671f124
가장 기본적인 3 tier 구성도 사진이다. 따라서, 해당 그림을 기반으로 만들 예정이다.
단, subnet은 8개로 구성된다. (public 2개, pirvate-was 2개, private-web 2개, private-db 2개)
- VPC
- Subnet
- Integer Gateway
- Nat Gateway
- Route Table
- Load Balancer
- EC2
+) 추가
 https://pearlluck.tistory.com/78
- 영역 및 IP 참조
Terraform AWS VPC
가장 먼저 만들어야 되는 서비스이다. vpc로 서비스를 올릴 영역을 만들어줘야 AWS가 가능하다.
resource "aws_vpc" "terra-vpc"{
    cidr_block = "10.0.0.0/16"

    tags = {
        Name = "terra-vpc"
    }
}
- cidr_block은 10.0.0.0/16으로 잡아줬다.
- 많은 블로그에서 vpc 생성 시 여러 옵션을 넣어주는데, 굳이 테스트에는 큰 필요가 없는 것 같아서 뺐다.
	# VPC에 DNS 옵션 설정
enable_dns_hostnames = true
enable_dns_support = true

	# 인스턴스 전용 하드웨어 옵션
instance_tenancy = "default"
Terraform AWS Gateway
Integer Gateway
vpc 다음에는 internet gateway를 설정해서, vpc가 인터넷으로 통할 수 있도록 통로를 뚫어줘야 한다.
resource "aws_internet_gateway" "terra-igw"{
    vpc_id = aws_vpc.terra-vpc.id
    tags = {
        Name = "terra-igw"
    }
}
- 만들어 둔 vpc에 igw가 연결되면 되므로 vpc_id를 이전에 만들어 둔 vpc의 name으로 지정해준다.
Nat Gateway
resource "aws_eip" "terra-nip"{
    vpc = true
    tags = {
        Name = "terra-nip"
    }
}

resource "aws_nat_gateway" "terra-ngw"{
    allocation_id = aws_eip.terra-nip.id
    subnet_id   = aws_subnet.terra-sub-pub-a.id
    tags = {
        Name = "terra-ngw"
    }
}
- vpc를 true로 둔 후 먼저 nat gateway를 생성한다.
- public a 영역에 nat gateway를 넣어준다.
Terraform AWS Subnet
총 8개의 subnet을 설정한다.
Public Subnet
# public
resource "aws_subnet" "terra-sub-pub-a"{
    vpc_id  = aws_vpc.terra-vpc.id
    cidr_block  = "10.0.1.0/24"
    availability_zone = "ap-northeast-2a"
    # public ip를 할당하기 위해 true로 설정
    map_public_ip_on_launch = true

    tags = {
        Name = "terra-sub-pub-a"
    }

}
resource "aws_subnet" "terra-sub-pub-c"{
    vpc_id  = aws_vpc.terra-vpc.id
    cidr_block  = "10.0.2.0/24"
    availability_zone = "ap-northeast-2c"
    map_public_ip_on_launch = true

    tags = {
        Name = "terra-sub-pub-c"
    }

}
- public은 bastion을 올려야 하기 때문에 public ip를 붙여야 하기 때문에 자동으로 public ip가 할당되도록 옵션을 지정해준다.
- 이중화를 위해 각각 a와 c 대역에 subnet을 지정했다.
Private Subnet
# private web
resource "aws_subnet" "terra-sub-pri-a-web"{
    vpc_id  = aws_vpc.terra-vpc.id
    cidr_block  = "10.0.10.0/24"
    availability_zone = "ap-northeast-2a"

    tags = {
        Name = "terra-sub-pri-a-web"
    }

}
resource "aws_subnet" "terra-sub-pri-c-web"{
    vpc_id  = aws_vpc.terra-vpc.id
    cidr_block  = "10.0.20.0/24"
    availability_zone = "ap-northeast-2c"

    tags = {
        Name = "terra-sub-pri-c-web"
    }

}
- private subnet이므로 map_public_ip_on_launch 옵션을 제거했다. default가 false값이다.
- 이후 각각 대역에 맞춰서 cidr_block 설정 후 subnet을 만든다.
- web 2개, was 2개, db 2개
Terraform AWS Route Table
Route Table은 내가(igw, ngw, etc) 무엇을 향해 갈지(subnet) 설정해 주는 역할을 한다.
먼저, Routing table을 만들고, 무엇을 향해 갈 것인지 route를 잡아준다.
2가지 방법으로 route table을 만들어 줬는데, 둘 다 사용 가능하다.
# public > igw
resource "aws_route_table" "terra-rt-pub" {
    vpc_id = aws_vpc.terra-vpc.id
    route {
        cidr_block = "0.0.0.0/0"
        gateway_id = aws_internet_gateway.terra-igw.id
    }
    tags = {
        Name = "terra-rt-pub"
    }
}

# public subnet을 public route table에 연결
resource "aws_route_table_association" "terra-rtass-pub-a"{
    subnet_id = aws_subnet.terra-sub-pub-a.id
    route_table_id = aws_route_table.terra-rt-pub.id
}

resource "aws_route_table_association" "terra-rtass-pub-c"{
    subnet_id = aws_subnet.terra-sub-pub-c.id
    route_table_id = aws_route_table.terra-rt-pub.id
}
- public 영역의 route table을 설정한다. route table을 생성하면서 사용할 igw도 선언했다.
- internet gateway는 0.0.0.0/0 (모두 open)으로 향한다.
- association을 통해 public subnet을 public route table에 연결한다.
# private web > nat
resource "aws_route_table" "terra-rt-pri-web"{
    vpc_id = aws_vpc.terra-vpc.id

    tags = {
       Name = "terra-rt-pri-web"
   }
}

resource "aws_route" "terra-r-pri-web"{
    route_table_id = aws_route_table.terra-rt-pri-web.id
    destination_cidr_block = "0.0.0.0/0"
    nat_gateway_id = aws_nat_gateway.terra-ngw.id
}

# private web subnet을 pirvate route table에 연결
resource "aws_route_table_association" "terra-rtass-pri-a-web"{
    subnet_id = aws_subnet.terra-sub-pri-a-web.id
    route_table_id = aws_route_table.terra-rt-pri-web.id
}

resource "aws_route_table_association" "terra-rtass-pri-c-web"{
    subnet_id = aws_subnet.terra-sub-pri-c-web.id
    route_table_id = aws_route_table.terra-rt-pri-web.id
}
- private 영역의 route table을 선언한다. 선언 후 nat와 연결하기위해 aws_route resource를 사용했다.
- 각각 web, was, db의 route table을 모두 분리했다. 따라서 private web subnet만 연결
Terraform paln & apply
Terraform plan으로 바뀌는 것을 확인한 후, apply를 진행한다.
 현재 폴더에 존재하는 테라폼 파일
terraform plan
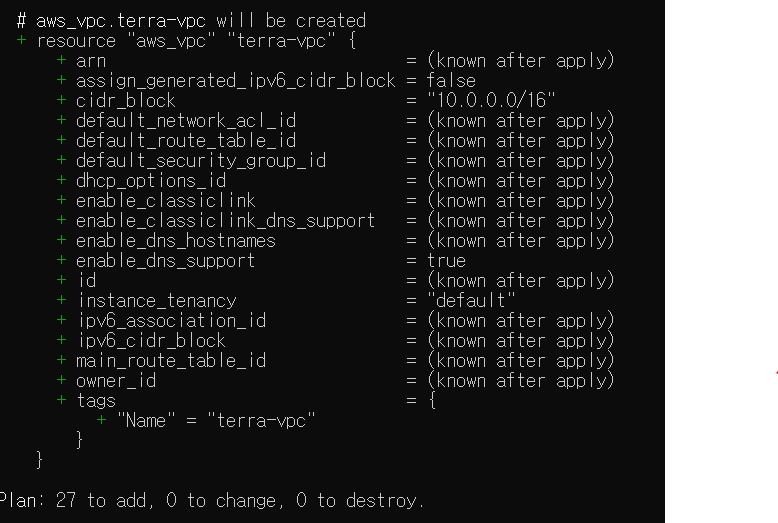
paln을 돌리게 되면 이처럼 변화하는 것과 개수가 나타나게 된다.
항상 apply 전에 해서 확인하는 것을 잊지 말자
terrafom apply

terraform apply를 하게 되면 중간에 이와 같이 바꿀 것인지 value를 치는 것이 나온다.
yes를 치면 terraform으로 resource를 생성하기 시작한다.
plan에서 통과가 된다고 하더라도 apply를 막상 시작하면 안 만들어지는 경우도 많다. 그런 경우 오류사항을 알려주니 수정을 하면 된다.
 성공. 26개인 이유는 이전에 테스트한거랑 이름이 겹쳐서 1개 만들고 다시 돌렸기 때문이다.
ec2 instance 생성과 sg, lb는 (2)에서 이어진다.
출처: https://honeywater97.tistory.com/87 [HoneyWater]
출처: https://honeywater97.tistory.com/87 [HoneyWater]환경 및 배경
- Windows 10 CMD
- Terraform
- AWS
- WEB, WAS, DB로 이루어진 3 tier Architecture 구성
- 네이밍룰: terra-리소스-영역-az ex) terra-subnet-pub-a
Terraform 다운로드
https://www.terraform.io/downloads.html
Download Terraform - Terraform by HashiCorpDownload Terraformwww.terraform.io
- 알맞는 Windows 파일 다운로드
- zip 파일 풀기 > terraform.exe 파일 위치를 환경변수 등록
terraform.exe가 존재하는 위치에 환경 변수 등록
Terraform 확인 및 init
이후 명령어는 모두 CMD 창에서 진행
- Terraform 설치 확인
terraform
- terraform init
해당 명령어를 실행하기 전, 먼저 AWS 계정과 연결해야 한다.
AWS Console에서 [계정이름] -> [내 보안 자격 증명] -> [액세스 키] -> [새 엑세스 키 만들기]
해당 액세스 키는 유출되지 않도록 조심
이 액세스 키를 만든 다음 받은 ID와 PW로 provider.tf 파일을 테라폼 코드를 저장할 폴더 위치에 생성한다. 테라폼은 기본적으로 폴더 단위로 명령어를 인식하기 때문에, 폴더를 나누는 것이 중요하다.
provider "aws" {
    access_key = "액세스키"
    secret_key = "액세스키 비밀번호"
    region = "ap-northeast-2"	# 지역을 서울로 선택
}
이후 cmd 창에서 해당 폴더 위치에 terraform init 명령어를 주면
terraform init
테라폼을 실행할 준비가 완료되었다.
AWS 3 tier Architecture
출처 medium.com/the-andela-way/designing-a-three-tier-architecture-in-aws-e5c24671f124
가장 기본적인 3 tier 구성도 사진이다. 따라서, 해당 그림을 기반으로 만들 예정이다.
단, subnet은 8개로 구성된다. (public 2개, pirvate-was 2개, private-web 2개, private-db 2개)
- VPC
- Subnet
- Integer Gateway
- Nat Gateway
- Route Table
- Load Balancer
- EC2
+) 추가
https://pearlluck.tistory.com/78
- 영역 및 IP 참조
Terraform AWS VPC
가장 먼저 만들어야 되는 서비스이다. vpc로 서비스를 올릴 영역을 만들어줘야 AWS가 가능하다.
resource "aws_vpc" "terra-vpc"{
    cidr_block = "10.0.0.0/16"

    tags = {
        Name = "terra-vpc"
    }
}
- cidr_block은 10.0.0.0/16으로 잡아줬다.
- 많은 블로그에서 vpc 생성 시 여러 옵션을 넣어주는데, 굳이 테스트에는 큰 필요가 없는 것 같아서 뺐다.
	# VPC에 DNS 옵션 설정
enable_dns_hostnames = true
enable_dns_support = true

	# 인스턴스 전용 하드웨어 옵션
instance_tenancy = "default"
Terraform AWS Gateway
Integer Gateway
vpc 다음에는 internet gateway를 설정해서, vpc가 인터넷으로 통할 수 있도록 통로를 뚫어줘야 한다.
resource "aws_internet_gateway" "terra-igw"{
    vpc_id = aws_vpc.terra-vpc.id
    tags = {
        Name = "terra-igw"
    }
}
- 만들어 둔 vpc에 igw가 연결되면 되므로 vpc_id를 이전에 만들어 둔 vpc의 name으로 지정해준다.
Nat Gateway
resource "aws_eip" "terra-nip"{
    vpc = true
    tags = {
        Name = "terra-nip"
    }
}

resource "aws_nat_gateway" "terra-ngw"{
    allocation_id = aws_eip.terra-nip.id
    subnet_id   = aws_subnet.terra-sub-pub-a.id
    tags = {
        Name = "terra-ngw"
    }
}
- vpc를 true로 둔 후 먼저 nat gateway를 생성한다.
- public a 영역에 nat gateway를 넣어준다.
Terraform AWS Subnet
총 8개의 subnet을 설정한다.
Public Subnet
# public
resource "aws_subnet" "terra-sub-pub-a"{
    vpc_id  = aws_vpc.terra-vpc.id
    cidr_block  = "10.0.1.0/24"
    availability_zone = "ap-northeast-2a"
    # public ip를 할당하기 위해 true로 설정
    map_public_ip_on_launch = true

    tags = {
        Name = "terra-sub-pub-a"
    }

}
resource "aws_subnet" "terra-sub-pub-c"{
    vpc_id  = aws_vpc.terra-vpc.id
    cidr_block  = "10.0.2.0/24"
    availability_zone = "ap-northeast-2c"
    map_public_ip_on_launch = true

    tags = {
        Name = "terra-sub-pub-c"
    }

}
- public은 bastion을 올려야 하기 때문에 public ip를 붙여야 하기 때문에 자동으로 public ip가 할당되도록 옵션을 지정해준다.
- 이중화를 위해 각각 a와 c 대역에 subnet을 지정했다.
Private Subnet
# private web
resource "aws_subnet" "terra-sub-pri-a-web"{
    vpc_id  = aws_vpc.terra-vpc.id
    cidr_block  = "10.0.10.0/24"
    availability_zone = "ap-northeast-2a"

    tags = {
        Name = "terra-sub-pri-a-web"
    }

}
resource "aws_subnet" "terra-sub-pri-c-web"{
    vpc_id  = aws_vpc.terra-vpc.id
    cidr_block  = "10.0.20.0/24"
    availability_zone = "ap-northeast-2c"

    tags = {
        Name = "terra-sub-pri-c-web"
    }

}
- private subnet이므로 map_public_ip_on_launch 옵션을 제거했다. default가 false값이다.
- 이후 각각 대역에 맞춰서 cidr_block 설정 후 subnet을 만든다.
- web 2개, was 2개, db 2개
Terraform AWS Route Table
Route Table은 내가(igw, ngw, etc) 무엇을 향해 갈지(subnet) 설정해 주는 역할을 한다.
먼저, Routing table을 만들고, 무엇을 향해 갈 것인지 route를 잡아준다.
2가지 방법으로 route table을 만들어 줬는데, 둘 다 사용 가능하다.
# public > igw
resource "aws_route_table" "terra-rt-pub" {
    vpc_id = aws_vpc.terra-vpc.id
    route {
        cidr_block = "0.0.0.0/0"
        gateway_id = aws_internet_gateway.terra-igw.id
    }
    tags = {
        Name = "terra-rt-pub"
    }
}

# public subnet을 public route table에 연결
resource "aws_route_table_association" "terra-rtass-pub-a"{
    subnet_id = aws_subnet.terra-sub-pub-a.id
    route_table_id = aws_route_table.terra-rt-pub.id
}

resource "aws_route_table_association" "terra-rtass-pub-c"{
    subnet_id = aws_subnet.terra-sub-pub-c.id
    route_table_id = aws_route_table.terra-rt-pub.id
}
- public 영역의 route table을 설정한다. route table을 생성하면서 사용할 igw도 선언했다.
- internet gateway는 0.0.0.0/0 (모두 open)으로 향한다.
- association을 통해 public subnet을 public route table에 연결한다.
# private web > nat
resource "aws_route_table" "terra-rt-pri-web"{
    vpc_id = aws_vpc.terra-vpc.id

    tags = {
       Name = "terra-rt-pri-web"
   }
}

resource "aws_route" "terra-r-pri-web"{
    route_table_id = aws_route_table.terra-rt-pri-web.id
    destination_cidr_block = "0.0.0.0/0"
    nat_gateway_id = aws_nat_gateway.terra-ngw.id
}

# private web subnet을 pirvate route table에 연결
resource "aws_route_table_association" "terra-rtass-pri-a-web"{
    subnet_id = aws_subnet.terra-sub-pri-a-web.id
    route_table_id = aws_route_table.terra-rt-pri-web.id
}

resource "aws_route_table_association" "terra-rtass-pri-c-web"{
    subnet_id = aws_subnet.terra-sub-pri-c-web.id
    route_table_id = aws_route_table.terra-rt-pri-web.id
}
- private 영역의 route table을 선언한다. 선언 후 nat와 연결하기위해 aws_route resource를 사용했다.
- 각각 web, was, db의 route table을 모두 분리했다. 따라서 private web subnet만 연결
Terraform paln & apply
Terraform plan으로 바뀌는 것을 확인한 후, apply를 진행한다.
현재 폴더에 존재하는 테라폼 파일
terraform plan
paln을 돌리게 되면 이처럼 변화하는 것과 개수가 나타나게 된다.
항상 apply 전에 해서 확인하는 것을 잊지 말자
terrafom apply
terraform apply를 하게 되면 중간에 이와 같이 바꿀 것인지 value를 치는 것이 나온다.
yes를 치면 terraform으로 resource를 생성하기 시작한다.
plan에서 통과가 된다고 하더라도 apply를 막상 시작하면 안 만들어지는 경우도 많다. 그런 경우 오류사항을 알려주니 수정을 하면 된다.
성공. 26개인 이유는 이전에 테스트한거랑 이름이 겹쳐서 1개 만들고 다시 돌렸기 때문이다.
ec2 instance 생성과 sg, lb는 (2)에서 이어진다.